 Thicket
Help
Installing, backing up and finding your way around. Short answers first.
Installing
- Click Download at the top of any page. It downloads
Thicket-Setup.exe, always the newest version. - Run it, and follow the steps.
Release notes and older versions are on GitHub's releases page.
Thicket installs for your Windows account only, so it doesn't need an administrator password. It's added to the Start menu; a desktop icon is optional. It needs 64-bit Windows 10 or 11 (it's tested on Windows 11).
"Windows protected your PC" and other warnings
Thicket isn't signed with a paid certificate (one costs over £100 a year), so the first time you download and run it you may see two warnings. Both are normal for a new program:
- Your browser may say the file "isn't commonly downloaded". Choose Keep. In Edge: click … next to the download, then Keep, then Show more › Keep anyway.
- Windows may show a blue box, "Windows protected your PC". Click More info, then Run anyway.
Want to check your download is the real one? Every release gives the installer's checksum: a long code that changes if even one byte of the file does. It's in the release notes and in SHA256SUMS.txt. Run this in PowerShell and compare the code it shows:
Get-FileHash "$HOME\Downloads\Thicket-Setup*.exe"
The first start
Thicket asks where you record:
- United Kingdom: the UK species list is built in, so there's nothing to download.
- A US state: that state's species pack downloads in a few seconds and is checked before it's installed.
Then add your first sighting with the Add sighting button, or press Ctrl+N.
Upgrading
Download the newer installer and run it. It replaces the program and keeps everything else: sightings, photos, settings and backups. If Thicket is open, the installer asks you to close it first.
Thicket used to be called WildLife. Installing Thicket over WildLife upgrades it the same way.
Where your data lives
In the folder %LOCALAPPDATA%\WildLife on your PC. (It keeps the app's first name, so nothing went missing in the rename.) To open it, press Win+R, paste that name and press Enter. Thicket also shows the full path in Settings › Data.
Installing, upgrading and uninstalling never touch this folder.
Backups
Thicket backs up by itself once a day and when you close it, and checks each backup can be read back. It keeps the last 7 days, 4 weeks and 12 months.
Do one thing: choose a backup folder on another drive, such as a USB drive or a second disk. Until you do, backups sit next to your data, so they wouldn't survive that drive failing. Go to Settings › Backup › Backup folder. Back up now is there too.
Restoring a backup
Go to Settings › Backup › Restore… and pick a backup. Your data goes back to how it was then. Your current data is kept as a safety copy first, and Thicket restarts to finish.
If Thicket ever can't open your data when it starts, it offers to restore the latest backup.
Deleted something by mistake? Deleted sightings and photos wait in the recycle bin for 30 days (Settings › Data), and most changes can be undone straight away.
Moving to a new PC
- On your old PC, set your backup folder to a drive you can move, such as a USB drive (Settings › Backup › Backup folder), and click Back up now.
- On the new PC, install Thicket and plug in that drive. Or copy its whole backup folder across: it's called Thicket Backups (or WildLife Backups, if you set it up before the rename).
- Go to Settings › Backup › Restore… › Choose a backup file…, open the snapshots folder inside the backup folder, and pick the newest backup.
Thicket restarts with your sightings, places, outings and photos. Use the whole backup folder, not just one file: the photos are kept beside the backups.
Importing from iNaturalist
Thicket can bring in everything you've recorded on iNaturalist, photos included. There are two parts: download your observations from the iNaturalist website as a file, then open that file in Thicket. Allow ten minutes the first time.
You'll need a computer for part 1: the iNaturalist phone app can't export.
Part 1: download your observations from iNaturalist
- Sign in at inaturalist.org, then open Export observations.
- At the top, the query says which observations to export. Check it includes your username, like
user_id=yourname. If it doesn't, type that in, with your own username. Leave the other filters alone to export everything. - In the list of columns, tick every column in the Basic, Geo and Taxon groups (each group has an All link). Thicket ignores the columns it doesn't need. These three groups have everything it uses, including the exact position of observations you've hidden from other people.
- Press Create Export at the bottom of the page. A few thousand observations take a minute or two. When the export is ready, a download link appears on the same page.
- Download it. You get a
.zipfile named something likeobservations-123456.csv.zip. Leave it as it is: Thicket opens the.zipitself. Don't open and save it in Excel first, which can change the dates.
Part 2: bring them into Thicket
- Go to Settings › Import & export › From iNaturalist, click Choose export file… and pick the
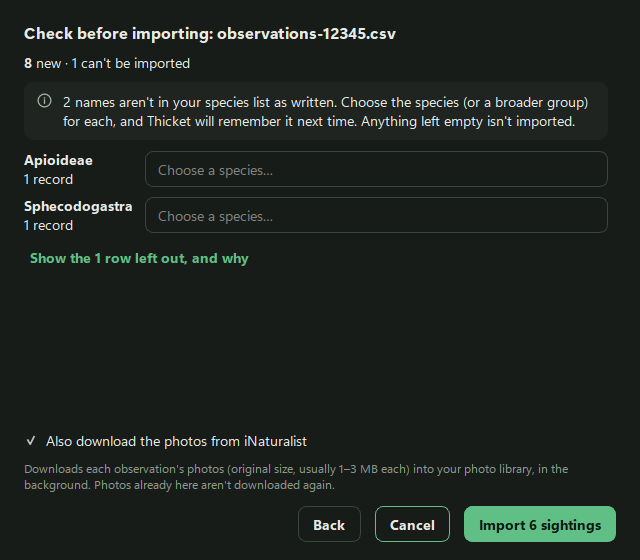
.zipyou downloaded (or the.csvinside it). - Thicket reads the file and shows Check before importing: how many observations are new, how many are already in Thicket, and how many can't be imported. Nothing has changed yet.
- If some names aren't in your species list as written, Thicket lists them. Choose the species (or a broader group, such as a genus) for each, and Thicket remembers your choice next time. Leave one empty to skip those records.
- Also download the photos from iNaturalist brings each observation's photos into your photo library, in the background (usually 1–3 MB each). It needs Allow online features on in Settings. Untick it if you'd rather not.
- Press Import (it says how many, such as Import 6 sightings). If the result isn't what you wanted, Undo import removes everything it added.
What comes across
- Identifications: research-grade observations are marked certain, the rest probable. You can choose whether probable ones count in your lists in Settings › Recording.
- Positions: the exact spot. For observations you obscured on iNaturalist, that needs the Geo columns from step 3. Without them, Thicket uses iNaturalist's blurred position and records how rough it is.
- Captive or cultivated observations are marked not wild, so they stay out of your life and year lists.
- Observations with only a sound recording are marked heard.
- The date and time you gave on iNaturalist, the place name, and your notes.
Importing again later
Export again whenever you like and import the new file. Only what's new or changed on iNaturalist is added. A sighting you've edited in Thicket keeps your version, and one you deleted in Thicket isn't brought back.
If some are left out
On the check page, Show the rows left out, and why lists each one, and Save this list… keeps it as a text file. The usual reasons are an observation with no identification yet, or no date. Fix them on iNaturalist, then import a new export.
Spreadsheets from other apps import in a similar way, from Settings › Import & export › From a spreadsheet.
Importing from eBird
Thicket can bring in your eBird checklists. eBird offers two kinds of file, and Thicket reads either:
- Download My Data (best): every species on every checklist, with its position, time, count and notes.
- A life or year list: only the first time you recorded each species, so you get one sighting per species.
Part 1: download your data from eBird
- Sign in at ebird.org, then open Download My Data (it's under My eBird).
- Press Submit. eBird prepares the file and emails you a link, usually within a few minutes.
- Download it from the link. You get a
.zipfile. Leave it as it is: Thicket opens the.zipitself, or theMyEBirdData.csvinside it.
Part 2: bring it into Thicket
- Go to Settings › Import & export › From eBird, click Choose eBird file… and pick the file.
- Check what Thicket found, matching any names that aren't in your species list (most birds match by their scientific name), then press Import. Undo import removes it all again if you need to.
Good to know
- Each checklist in Download My Data becomes an outing, with its date, times, place and comments, so its sightings stay together on the calendar. Each sighting also links back to its checklist on eBird.
- Import a newer download whenever you like: only new checklists and species are added.
- Imported a life list first? Import Download My Data afterwards, and it fills in those sightings' times and positions without doubling anything up. A sighting you've edited in Thicket keeps your version.
- A checklist has one position, where it started, so the precision allows for the distance you walked.
- In a life list, eBird hotspots come without a position, so they keep just their name until you import Download My Data. If you've saved a place with the same name, Thicket uses it.
- Escaped and domestic birds are marked not wild, so they stay out of your lists. Naturalised species, such as Mandarin Duck, count as usual.
- Importing from eBird doesn't use the internet: everything is in the file.
Changing region
Go to Settings › Region. You can switch between the UK and US states, or add another state's pack for a trip. Packs only add species: your sightings never change.
Uninstalling
Open Windows Settings › Apps › Installed apps (Apps & features on Windows 10), find Thicket and choose Uninstall. Your data is kept, and the uninstaller tells you where. To remove it as well, delete the %LOCALAPPDATA%\WildLife folder afterwards (and your backup folder, if you chose one).
Is there a Mac or phone version?
No: Thicket is for Windows only. Out and about, take photos with your phone. Back home, add them to Thicket's Photo Inbox, and it reads when and where each one was taken. If you record with the iNaturalist app, you can import those records too.
Something's wrong
- Settings › Data › Health check checks your data file, every photo, your backups and the species list, and explains anything it finds.
- Still stuck? Use Settings › About › Report a problem…. It opens a short form on GitHub in your browser, with Thicket's and Windows' versions already filled in (you'll need a free GitHub account). Or start one here. Say what you did and what happened.
- If Thicket shows "Something went wrong", its Report it… button copies the details and opens the same form: paste them in. Read them first, and remove anything private, such as folder names.
- Settings › About › Open log folder has Thicket's log files, which help too. Check them before attaching one, for the same reason.
Ideas are welcome as well: Settings › About › Suggest an idea….